Vr Mapping |
ON-LINE REFERENCE DOCUMENTATION CARDINAL SYSTEMS, LLC |
Image Clean (ImaCle)
Type: Interactive/Batch Application
Cleans scratch marks on images.
Detailed Description
This application will clean scratch marks on images by allowing the user to place VrOne lines on top of the scratches. A blending technique tries to recreate the original pixels that were under the scratches. Scratches may be cleaned using a set blending width for all scratches, or by using the line width to allow a different blending width for each scratch. A preview mode allows instant viewing of the cleaned images before they are written out to new files. The following steps define a typical usage of the Image Clean application.
| 1. | In VrOne, open images to be cleaned. |
| 2. | Open or create a new VrOne file to hold the lines that will be placed on top of the scratches. |
| 3. | Start the Image Clean application. |
| 4. | Display the Enter Parameters dialog box (button 7) and adjust the settings as needed. |
| 5. | Turn on Preview Mode (button 1) (optional). |
| 6. | Without exiting the Image Clean application, use the Insert Line application to place lines into the “clean” layer that was specified in the parameter dialog box. These lines should be placed directly on top of the scratches to be removed. These can be simple two point lines or more complex polygons. TIP: If Preview Mode is on, you may want to turn off the “clean” lines layer before starting to place the clean lines. When a layer is off in VrOne, you can still insert lines into it, and they will be displayed until a replot command is issued. When placing clean lines this way, you can issue a replot after each line is saved. The replot will remove the line from the display and instantly show the effects of the scratch removal. |
| 7. | After all clean lines have been placed and scratch removal has been verified using Preview Mode, the cleaned images may all be saved using the Output Images (button 2) command. |
Parameters
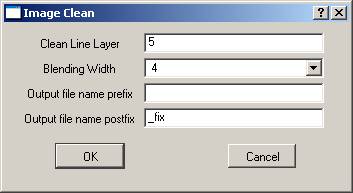
Clean Line Layer
Specifies the layer to search for clean lines. All workspaces will be searched.
Blending Width
Specifies the pixel blending width to use when removing scratches. This is the width of pixels that will be changed along each clean line. If the “Same as line width” option is selected, then the blending width will be determined by each lines display width. This setting may take some experimentation, but you should always specify the smallest blending width that still removes the scratch completely. Larger blending widths will produce undesirable results when viewed up close. A width that is too small will require a more exact placement of the clean lines; therefore, a width of 3 is probably the smallest practical width that should be used.
Output file name prefix
Specifies the prefix to add to all output file names. Output files will always be placed in the same directory as the input files but will have this prefix added to the filename. If this is left blank, a postfix must be specified.
Output file name postfix
Specifies the postfix to add to all output file names. Output files will always be placed in the same directory as the input files, but will have this postfix added to the filename. If this is left blank, a prefix must be specified.
Button Assignments
Image Clean – Main
|
Button |
Description |
1 |
Tog Preview |
Toggles preview mode. |
2 |
Output Imgs |
Outputs all images with scratches removed to new files. |
3 |
|
|
4 |
|
|
5 |
|
Displays Edit Seams menu allowing seam line to be edited. |
6 |
|
|
7 |
Enter params |
Enter parameters from dialog box. |
8 |
|
|
9 |
|
|
* |
|
|
0 |
|
|
# |
End |
Ends application. |