Vr Mapping |
ON-LINE REFERENCE DOCUMENTATION CARDINAL SYSTEMS, LLC |
Z/I Mouse
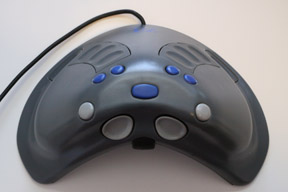
The Z/I Mouse
The Z/I Mouse is a high-precision, 3D mouse used for input of 3D data from photogrammetric and stereo sources. Features include 3D input from mouse motion and Z-wheel inputs, 3D input from force sticks (with the USB interface) and 15 programmable buttons
The Z/I Mouse is connected to the computer via a standard USB (Universal Serial Bus) connector. Power is supplied to the Z/I Mouse via a power adapter that is connected to a power plug near the USB connector. The Z/I Mouse is supported in Windows XP 32-bit and Windows 7 64-bit. Both the 32-bit and 64-bit versions of VrTwo support the Z/I Mouse.
One of two driver types are available for the Z/I Mouse.
| • | Joystick Driver Type - This driver is included in Windows and does not require the loading of another driver. The force sticks are not supported when using this driver. In the Device Control for the Z/I Mouse (DevZim) this is driver type "Joystick". |
| • | USB Driver Type - All inputs are supported with the use of this driver. The loading and configuration of a driver is necessary to use this driver type (See Driver Installation for the USB Driver Type). In the Device Control for the Z/I Mouse (DevZim) this is driver type "USB". The current executable file containing the driver and the filter is "libusb-win32-devel-filter-1.2.4.0.exe" and can be found in the drivers folder in the "Download Vr Mapping Software" area of the web page. The file is also delivered with the Vr Mapping installation and if the default install folder is used, can be found in c:\vr\bin. |
NOTE: Any existing non-Vr mouse driver must be removed in order for this driver to work correctly. This includes drivers that allow the Z/I mouse to work similar to the system mouse. The Vr Mapping driver considers the Z/I mouse a separate device from the system mouse.
NOTE: If the mouse begins to miss button presses, the USB driver can be restarted by unplugging the USB connector from the computer, unplugging and reinserting the power supply and reinserting the USB connector.
Driver Installation for the USB Driver Type
There are two steps involved when installing the USB driver. The first is driver installation and the second is the installation of a driver filter for the Z/I Mouse. Before installing the driver and filter, plug in the USB connector for the mouse and make sure the device is powered. Tuning the mouse upside down should show the red mouse sensor light when the device is powered.
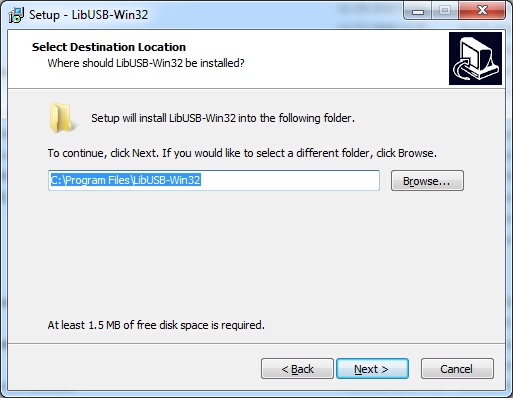
Select a destination folder for the installation of the driver. The default folder is recommended.
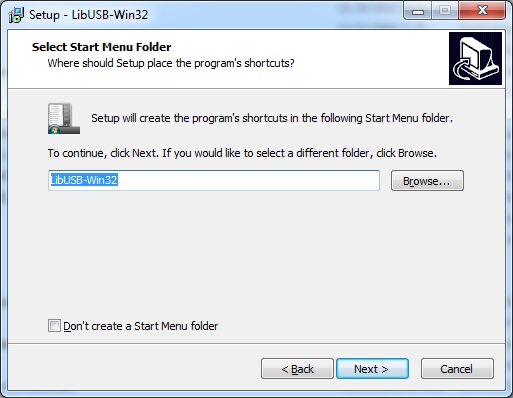
Select a optional shortcut in the Start Menu folder. The default shortcut is recommended.
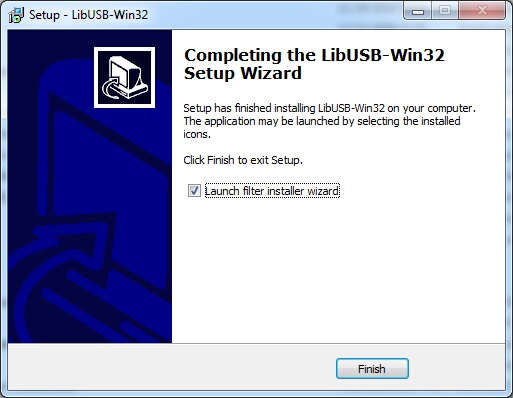
Once the USB driver is installed, the next step is to install the driver filter for the mouse. This is accomplished with the Filter Installer Wizard which is started after the USB driver is installed. Check Launch filter installer wizard and press Finish to start the next step.
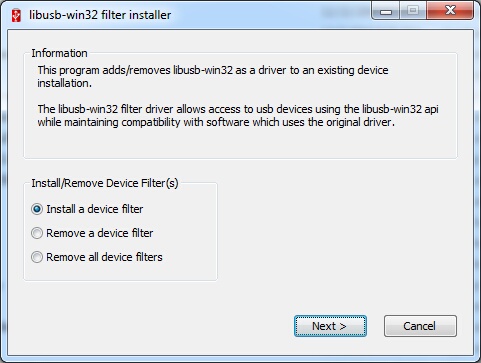
Check "Install a device filter" and press Next. If the existing device filter or filters need to be removed one of the Remove options may be selected. A device filter can be removed and re-installed multiple times.
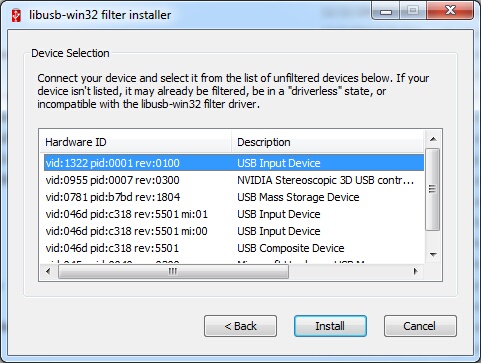
Highlight the vid:1322, USB Input Device line as shown above. The Z/I Mouse uses the Vendor Id (vid) of 1322 and the Product Id (pid) of 0001.
If the device is not shown then the driver might be already installed or the Z/I Mouse is not plugged in or it might not be powered. Once the correct device is highlighted the Install button may be pressed to install the driver for the Z/I Mouse. Once the mouse is installed the above dialog is redisplayed and Cancel may be pressed to end the installation process.
Vr Configuration - Selecting the Z/I Mouse
Vr may be configured to use the Z/I Mouse from the Vr Configuration program (VrCfig). From the Configuration pull-down, the “VrTwo 3D input” item may be selected which will bring up to following dialog box.
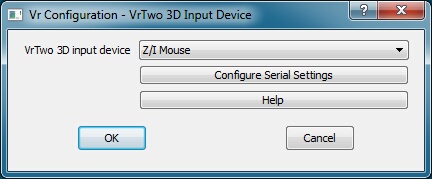
Serial settings are not needed for the use of the Z/I Mouse so the Configure Serial Setting option displays a message indicating such.
Any button on the Z-Mouse may be programmed to emit one of the following:
| • | A VrOne button press with a value from 0 to 11 (b0-b11). Button press 10 is the Vr * key, button press 11 is the 0 key (used to condition snap) and button press 11 is the # key which is normally used to terminate a VrOne application. |
| • | Any valid VrOne key-in. These key-ins may include a VrOne key-in, Macro or Function Key. Multiple key-ins may be placed on a single key up to 64 characters. |
| • | A Clutch function. |
To configure button assignments the Input->Device Controls->ZI Mouse may be selected or type DevZim (Device ZI Mouse) while in VrOne or VrTwo. Some of the changes made to the button assignments and configuration settings do not take effect until the driver is started again. The driver may be restarted by restarting the program or switching between static and roaming stereo display modes.
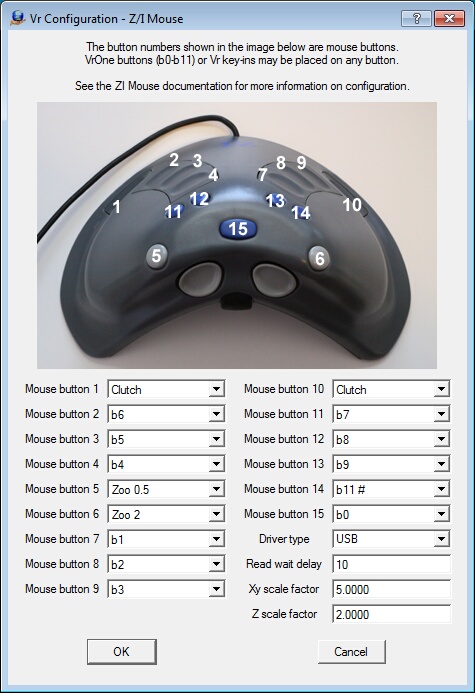
The Z/I Mouse configuration dialog box
Mouse button / Shift Mouse button
There are ten user definable mouse buttons available on the Z/I Mouse. If one of the Mouse Buttons are assigned as a Clutch button then motion inputs are ignored while this button is being held down. In the dialog box displayed above, the right columns contain the user-defined key definitions that will be executed when the button is pressed. All button assignments will emit a command when the button is pressed and will not emit another until the button is raised and pressed again.
Possible button assignments are:
| • | B0-b11 - VrOne button presses 1-12. |
| • | Key-in - Any valid VrOne key-in |
| • | Clutch – When pressed, the XY motion of the Z-Mouse are disconnected. The Clutch button can be placed on any Mouse Button 1 through 15 and more than one button may be assigned as a Clutch button. |
Assigning VrOne Key-ins - VrOne key-ins may be placed on any key simply by typing the desired VrOne command or commands up to 64 characters. Multiple commands are separated by a comma. For example;
ZooA, SetLayMacro, RoadFuncKey
Could be entered which would perform a Zoom All then run the SetLayMacro macro then start the RoadFuncKey function key. Of course, SetLayMacro and RoadFuncKey are defined by the user.
Driver Type
One of two driver types are available for the Z/I Mouse.
| • | Joystick Driver Type - This driver is included in Windows and does not require the loading of another driver. The force sticks are not supported when using this driver. This is driver type "Joystick". |
| • | USB Driver Type - All inputs are supported with the use of this driver. The loading and configuration of a driver is necessary to use this driver type. This is driver type "USB". See Driver Installation for the USB Driver Type. |
If this parameters is changed then the driver must be restarted by restarting the program or switching between static and roaming stereo display modes.
Read Wait Delay
The Read Wait Delay determines the amount of time to wait between reads. This value is expressed in milliseconds where 1000 is 1 second.
XY Scale Factor
This parameter sets the scale factor of XY input from the mouse. A value of 1 is no scale factor. A negative number reverses the direction of the motion.
Z Scale Factor
This parameter sets the scale factor of Z input from the mouse. A value of 1 is no scale factor. A negative number reverses the direction of the motion.
VrOne/VrTwo Menu Keys Dialog
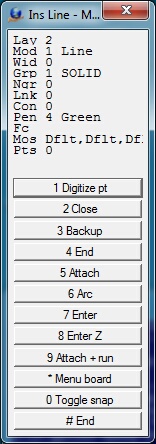
VrOne/VrTwo allows interactive input from 12 buttons. These Vr Buttons are assigned to the system keyboard F1 - F12 keys and may be assigned to buttons on input devices such as the Z/I Mouse. The b0-b11 button assignments correspond to VrOne button presses 1-12 as shown in the Insert Line example above. Following are the b0-b11 assignments.
b1 - Vr button press 1
b2 - Vr button press 2
b3 - Vr button press 3
b4 - Vr button press 4
b5 - Vr button press 5
b6 - Vr button press 6
b7 - Vr button press 7
b8 - Vr button press 8
b9 - Vr button press 9
b10 - Vr button press *
b0 - Vr button press 0 (toggle snap on/off)
b11 - Vr button press # (normally used to terminate a VrOne/VrTwo application)