Vr Mapping |
ON-LINE REFERENCE DOCUMENTATION CARDINAL SYSTEMS, LLC |
Edit Toolbars (EdiToo)
Type: User Interface
Allows new toolbars to be created and defined.
Detailed Description
Toolbars are groups of command buttons that can be represented as icons or text. They may be used as stand-alone floating windows or may be docked with the VrOne Main and Graphics windows. The buttons on a toolbar may be used to start any Vr Mapping key-in command, Function Keys and Macros.
See also Display Toolbar
Example Toolbars with icons
Creating a Toolbar Containing Brightness and Contrast Controls
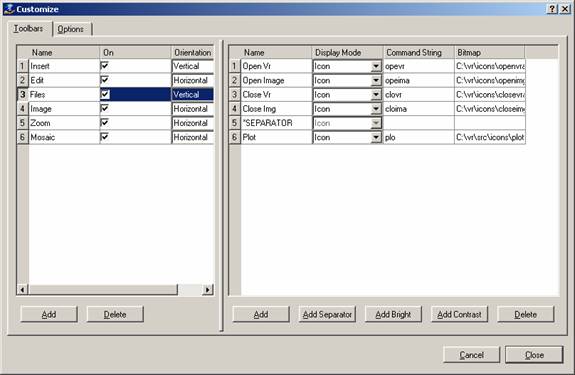
Displayed above is the Edit Toolbars dialog with six toolbars defined. The left side of the dialog displays the toolbars. The toolbar named “Files” is currently highlighted, and as a result, the right hand side of the dialog displays the command buttons that are assigned to the “Files” toolbar.
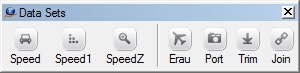
The image below shows the “Files” toolbar as a floating window (not docked). The Orientation on this toolbar is to Vertical, which only affects the toolbar when it is floating. Notice the use of the “SEPARATOR” item to place a line between the Close Img command button and the Plot command button.
![]()
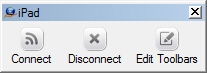
The following image shows the “Files” toolbar docked in the VrOne main window.

Using the Edit Toolbars Dialog
Left Pane
The left hand pane displays a table of all currently defined toolbars. Whenever an item in the toolbar table is selected, the right hand pane displays the toolbar command buttons that are associated with the highlighted toolbar. Use the “Add” button to create new toolbars. Use the “Delete” button to delete the currently highlighted toolbar command button. The following items may be defined for each toolbar, and are edited by directly changing the items in the table.
Name |
This is the name of the toolbar. Each toolbar should have a unique name, which will be displayed in the window title if the toolbar is not docked. |
On |
Determines whether the toolbar is displayed or not. |
Orientation |
The toolbar orientation may be set to Horizontal or Vertical. This only affects the toolbar when it is not docked. |
Right Pane
The right hand pane displays a table of command buttons that are defined for the currently highlighted toolbar. Use the “Add” button to create new command buttons. Use the “Delete” button to delete the currently highlighted command button. Three special purpose buttons are provided to make it easy to add Separators, Brightness Controls, and Contrast controls. The following items may be defined for each command button and are edited by directly changing the items in the table.
Name |
This is the name of the command button. Each command button should have a unique name, which will be displayed on the command button if the display mode is “Text” or “Both”. |
Display Mode |
This determines if the command button displays an Icon (image), Text, or both an Icon and Text. |
Command String |
This is the command string that is used when the command button is pressed. This may be any valid VrOne command input, such as a normal command, macro command, or function key name. |
Bitmap |
This is the image that is displayed if Icon or Both is selected for Display Mode. |
Creating a Toolbar Containing Brightness and Contrast Controls
![]()
The following steps may be used to create a Toolbar containing the brightness and contrast controls.
| 1. | Run Edit Toolbar (EdiToo) |
| 2. | Press the "Add" button on the left pane to create a new toolbar. Change the name from "New" to "Image" and press the Tab key. |
| 3. | Press the "Add Bright" button on the right pane. This adds a brightness slider to the toolbar. |
| 4. | Press the "Add Contrast" button on the right pane. This adds a contrast slider to the toolbar. |
| 5. | Close the Edit Toolbars dialog. |
| 6. | A floating toolbar containing the image controls is now displayed. Dragging this toolbar over the bottom portion of the graphics window and releasing it will “dock” the toolbar to the window. The border changes to a thinner line when the toolbar is in a position to be docked. |
Vr Mapping versions prior to 05.05.20
The Toolbar parameter information is stored in two files; the .vrt and the .vrtoollayout files which are in the \vr\hostdir folder. The program name precedes the file name. For example, the toolbar parameters for the VrOne program are stored in \vr\hostdir\vrone.vrt and \vr\hostdir\vrone.vrtoollayout.
Vr Mapping versions 05.05.20 and above
The two predefined parameter files (.vrt and .vrtoollayout) have been replaced with a single user defined parameter file (.vrt). The first time running version 05.05.20 or later, the legacy parameter files will be automatically converted to the new parameter file.
The file name for the new parameter file is defined in the Vr Configuration program under Configuration -> General and defaults to \vr\data\default_vrone.vrt for the VrOne and VrTwo programs and \vr\data\default_vrmosaic.vrt for the VrMosaic program.
When the new parameter file is written, the two legacy files are also updated for backwards compatibility with older versions of Vr Mapping.
Document updated August 2024