Vr Mapping |
ON-LINE REFERENCE DOCUMENTATION CARDINAL SYSTEMS, LLC |
Stealth Z-Mouse / Stealth Hand Wheels
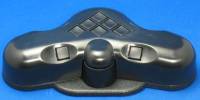
 Stealth S1-Z
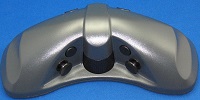
 Stealth S2-Z
 Stealth S3-Z
 Stealth S4-Z
The Stealth Z-Mouse is a free-hand device for moving the cursor in the XYZ directions in VrTwo. Several sizes are available; the S1-Z, S2-Z, S3-Z and the S4-Z (Stealth 4). Features include a mouse-style optical movement sensor for the XY movements and a Z-wheel for Z movements. 18 user definable buttons are available. The VrOne Stealth Z-Mouse driver allows any button to be programmed to emit a predefined VrOne key press from 0 to 11 or any VrOne key-in which may include key-ins, macros and (or) function keys.
Note: The newer Stealth 4 Mouse (S4-Z) is a Z-Mouse and uses the Stealth Z-Mouse drivers.
The Stealth Handwheels include two high-precision XY handwheels along with a Z foot disk. Also include are three-pedal footswitches. The Stealth Z-Mouse and the Stealth Handwheels share the same driver in interface.
The Z-Mouse differs from the original Stealth 3D Mouse in that it does not configure as a Windows mouse so when in operation the Windows mouse may be used for normal operations such as pulling down menus etc.
For more information about the Stealth 3D Mouse line of products including the Stealth Z-Mouse please the Stealth International web page. Stealth International provides a wide range of 3D input devices and offers sales and support of these products.
The Stealth Z-Mouse and Hand Wheels are connected to the computer via a standard USB (Universal Serial Bus). Power is supplied from the USB interface and an AC adapter is not needed.
If the Stealth Z-Mouse has been upgraded to support Windows 8 then the driver installation is automatic when the USB cable is plugged into the computer. Please see "Driver Installation for Windows 10" below for more information.
If running Windows XP or Windows 7, plug your mouse or hand wheels into the USB Port. Windows Plug and Play will normally pop up to ask for a disk. Insert the CD provided into your CD reader, and tell Windows that you have a disk. Installation should be automatic. If it does not install automatically, run Control Panel/Add new hardware, and manually install the driver, indicating the CD drive and directory. The drivers for the Stealth Z-Mouse may be loaded from the Stealth 3D Mouse web page at http://stealth3dmouse.com/ under Drivers. If the drivers are downloaded from the web site then a CD is not needed for installation.
Driver Installation for Windows 7
| 1. | Download version 2.0x from www.stealth3dmouse.com. |
| 2. | Un-compress the Stealth driver files and placed the contents into the C:\Stealth folder. If this folder does not exist then create it before un-compressing the driver file. |
| 3. | Plug in Stealth USB cable. NOTE: If Windows begins to install the "Device Driver Software", open the Driver Software Installation dialog and press "Skip obtaining driver software from Windows update". |
| 4. | "Stealth Z-Mouse V01" should appear in the main Device Manager dialog window. |
| 5. | Start Device Manager (Click Start button -> Type "Device Manager" in search box -> Click Device Manager). Right mouse click "Stealth Z-Mouse V01" -> Select "Update Driver Software" |
| 6. | Select "Browse my computer for driver software" |
| 7. | Entered c:\Stealth in search box, press Next |
| 8. | Repeat steps 4-6 to install drivers from the USB Serial Port. Substitute "USB serial port" for "Sealth Z-Mouse V01". (This step may not be needed with later drivers) |
NOTE: If Windows installs the wrong driver, restart the Device Manager -> select "Universal Serial Bus controllers" -> Right mouse click "USB Serial Converter" -> Uninstall and check "Delete the driver software for this device". Unplug the Stealth USB cable and return to step 3 above.
Driver Installation for Windows 10
If the current Stealth Z-Mouse was used on Windows 7 then the mouse must be upgraded to run on Windows 8 which will allow it to run on Windows 10. This upgrade can be done by following the instructions on the Stealth 3D Mouse web page under Drivers. Select "Download and follow instructions to modify Stealth Z-Mouse for Win 8" to upgrade the mouse. Once the mouse has been upgraded, it can be plugged into a Windows 10 computer and configuration will be automatic. NOTE: The upgrade must be performed from Windows 7.
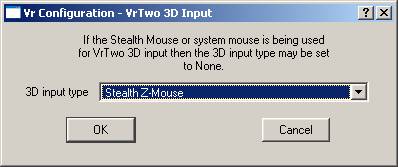
Vr may be configured to use the Z-Mouse or Handwheels from the Vr Configuration program (VrCfig). From the Configuration pull-down, the “VrTwo 3D input” item may be selected which will bring up to following dialog box.
Stealth Z-Mouse / Vr Button Assignments
Any button on the Z-Mouse may be programmed to emit one of the following:
| • | A VrOne button press with a value from 0 to 11 (b0-b11). Button press 10 is the Vr * key, button press 11 is the 0 key (used to condition snap) and button press 11 is the # key which is normally used to terminate a VrOne application. |
| • | Any valid VrOne key-in. These key-ins may include a VrOne key-in, Macro or Function Key. Multiple key-ins may be placed on a single key up to 64 characters. |
| • | A Clutch / Shift function. |
To configure button assignments the Input->Device Controls->Stealth Z-Mouse may be selected or type DevSzm (Device Stealth Zmouse) while in VrOne or VrTwo.
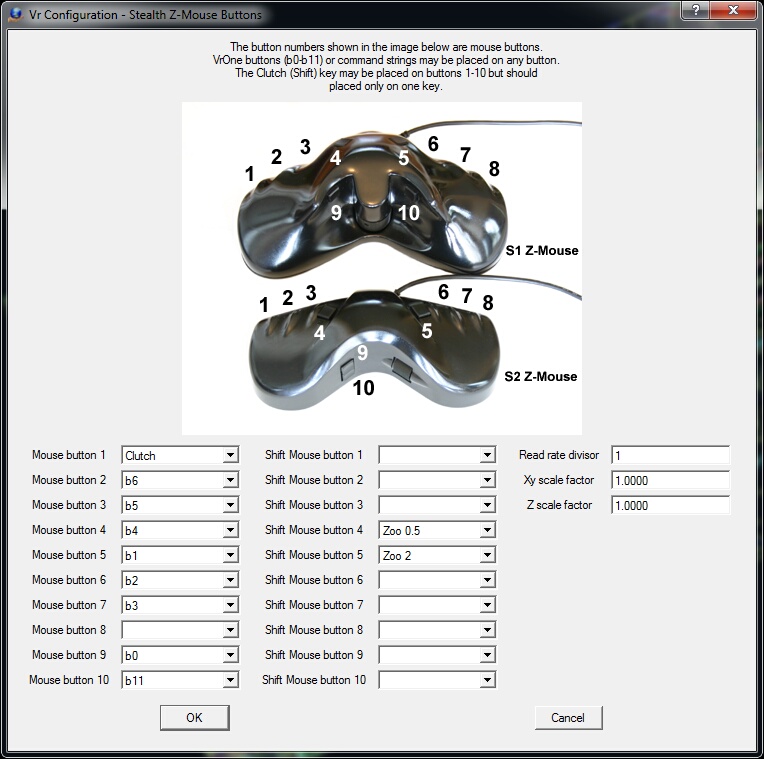
The Stealth Z-Mouse Button assignment dialog box
Mouse button / Shift Mouse button
There are ten user definable mouse buttons available on the Stealth Z-Mouse. If one of the Mouse Buttons are assigned as a Clutch/Shift button then the Shift Mouse Buttons are available for assignment. In the dialog box displayed above, the right columns contain the user-defined key definitions that will be executed when the button is pressed. All button assignments will emit a command when the button is pressed and will not emit another until the button is raised and pressed again.
Possible button assignments are:
| • | B0-b11 - VrOne button presses 1-12. |
| • | Key-in - Any valid VrOne key-in |
| • | Clutch (Shift) – When pressed, the XY motion of the Z-Mouse are disconnected. The Clutch / Shift button can be placed on any Mouse Button 1 through 10. It is not recommended to use more than one Clutch button. If more than one is used then one Clutch button cannot act as a Shift button to the other. The button that the Clutch/Shift function is assigned cannot be shifted. For example; If the Mouse Button 1 is assigned as a Clutch/Shift key then the Shift Mouse Button 1 assignment will be ignored. |
Assigning VrOne Key-ins - VrOne key-ins may be placed on any key simply by typing the desired VrOne command or commands up to 64 characters. Multiple commands are separated by a comma. For example;
ZooA, SetLayMacro, RoadFuncKey
Could be entered which would perform a Zoom All then run the SetLayMacro macro then start the RoadFuncKey function key. Of course, SetLayMacro and RoadFuncKey are defined by the user.
Read rate divisor
The Read divisor may be set to slow down the input from the mouse with 1 being the fastest setting.
XY Scale Factor
This parameter sets the scale factor of XY input from the mouse. A value of 1 is no scale factor. A negative number reverses the direction of the motion.
Z Scale Factor
This parameter sets the scale factor of Z input from the mouse. A value of 1 is no scale factor. A negative number reverses the direction of the motion.
Stealth Hand Wheel Foot Switch / Vr Button Assignments
Any foot switch on the Hand Wheel Foot Switch may be programmed to emit one of the following:
| • | A VrOne button press with a value from 0 to 11 (b0-b11). Button press 10 is the Vr * key, button press 11 is the 0 key (used to condition snap) and button press 11 is the # key which is normally used to terminate a VrOne application. |
| • | Any valid VrOne key-in. These key-ins may include a VrOne key-in, Macro or Function Key. Multiple key-ins may be placed on a single key up to 64 characters. |
To configure button assignments the Input->Device Controls->Stealth Handwheels may be selected or type DevSha (Device Stealth Handwheels) while in VrOne or VrTwo.
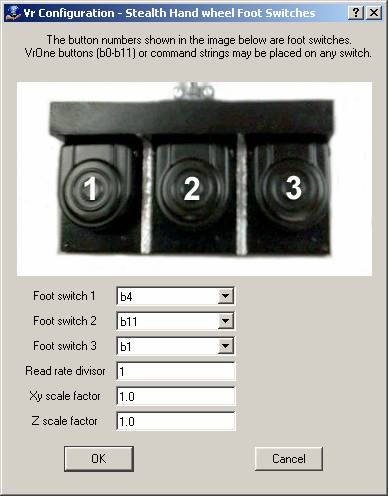
The Stealth Hand Wheel Foot Switches assignment dialog box
Foot switch
The Foot switch button numbers are displayed in the left column and reference the Z-Mouse buttons as shown in the image above. The right columns contain the user-defined key definitions that will be executed when the button is pressed.
All foot switch assignments will emit a command when the button is pressed and will not emit another until the button is raised and pressed again.
Possible button assignments are:
| • | B0-b11 - VrOne button presses 1-12. |
| • | Key-in - Any valid VrOne key-in |
Assigning VrOne Key-ins - VrOne key-ins may be placed on any key simply by typing the desired VrOne command or commands up to 64 characters. Multiple commands are separated by a comma. For example;
ZooA, SetLayMacro, RoadFuncKey
Could be entered which would perform a Zoom All then run the SetLayMacro macro then start the RoadFuncKey function key. Of course, SetLayMacro and RoadFuncKey are defined by the user.
Read rate divisor
The Read divisor may be set to slow down the input from the mouse with 1 being the fastest setting.
XY Scale Factor
This parameter sets the scale factor of XY input from the mouse. A value of 1 is no scale factor. A negative number reverses the direction of the motion.
Z Scale Factor
This parameter sets the scale factor of Z input from the mouse. A value of 1 is no scale factor. A negative number reverses the direction of the motion.
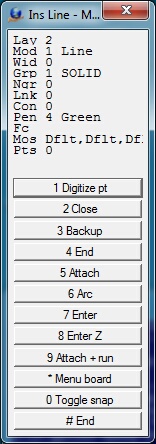
VrOne/VrTwo Menu Keys Dialog
VrOne/VrTwo allows interactive input from 12 buttons. These Vr Buttons are assigned to the system keyboard F1 - F12 keys and may be assigned to buttons on input devices such as the Stealth Z-Mouse. The b0-b11 button assignments correspond to VrOne button presses 1-12 as shown in the Insert Line example above. Following are the b0-b11 assignments.
b1 - Vr button press 1
b2 - Vr button press 2
b3 - Vr button press 3
b4 - Vr button press 4
b5 - Vr button press 5
b6 - Vr button press 6
b7 - Vr button press 7
b8 - Vr button press 8
b9 - Vr button press 9
b10 - Vr button press *
b0 - Vr button press 0 (toggle snap on/off)
b11 - Vr button press # (normally used to terminate a VrOne/VrTwo application)